How to Configure Public IPV6 to Ubuntu Linux Server
In the previous article we discussed what IPv6 is and what features it comes with. In short, IPv6 was introduced to the world as a precaution to the exhaustion of IPv4 addresses. IPv4 being a 32 bit address, IPv6 has a massive 128 bit address space.
In this article we will show how to setup IPv6 addresses on Ubuntu. Note that these commands are done on Ubuntu 16.04 LTS.
In order to go through with this setup you will need to be logged in as the root user. Your terminal will look similar to the one below.

If you are not logged in as root user, then in order to login use the following code and type your password.
sudo –i

Now we will need to enable IPv6 configurations and in order to do that we will be working throughout this article with nano editor. You can use any file editor you prefer.
First, you will have edit the sysctl.conf file, which can be done with the following code:
~# nano /etc/sysctl.conf

In the opened file at the bottom add these two lines and exit the editor after saving the changes.
net.ipv6.conf.default.disable_ipv6 = 0
net.ipv6.conf.all.disable_ipv6 = 0

Now it’s time to change your IPv6. To do so, write the following code in your terminal.
nano /etc/network/interfaces

Once you are in the editor at the end of the file add the following code.
iface enp0s3 inet6 static
pre-up modprobe ipv6
address Your-IPv6-Address
netmask 64
gateway Your-Ipv6-Gateway-Address
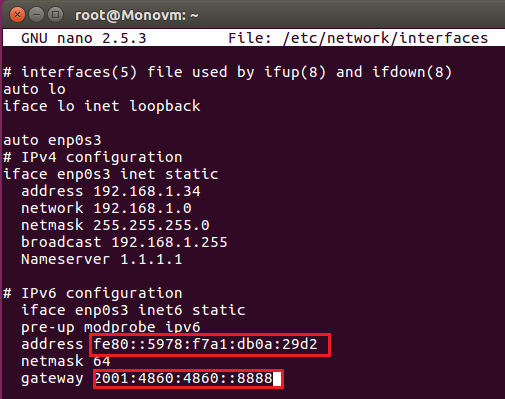
Note that these addresses are examples of IPv6 addresses and in those places you will need to provide your desired IPv6 address. Save the chnages to the file and exit the editor.
Now in order these changes to take effect, you wll need to restart your networking service with the following command:
~#sudo systemctl restart networking